How to Upgrade Your Laptop’s RAM and Storage Yourself
SEO title: Upgrade Laptop RAM and Storage: 7 Proven Steps to Do It Yourself Safely
Upgrade Laptop RAM and Storage: 7 Proven Steps to Do It Yourself Safely
Introduction
Upgrade laptop RAM and storage yourself and you can often turn a sluggish three-year-old machine into something that feels close to new, for a fraction of what a replacement costs. That part is true. What most guides skip is everything around the screwdriver: whether your laptop can be upgraded at all, whether the cheap SSD you found online is real, whether opening the case actually voids your warranty, and what happens to the personal data on the old drive you pull out.
This guide covers all of it. You will get the practical steps, from checking compatibility to seating a new memory module and cloning your old drive. You will also get the realities, backed by real cases. In 2022 the US Federal Trade Commission went after companies whose warranties illegally told customers that independent repairs would void coverage. Counterfeit SSDs that look identical to the real thing have been sold to buyers in India, Europe, and through major marketplaces. And Morgan Stanley paid a $35 million penalty after old hard drives full of customer data ended up on an auction site without being wiped.
None of that should scare you off. A laptop RAM upgrade or laptop SSD upgrade is one of the most beginner-friendly hardware jobs there is. The goal here is simply to help you do it with clear eyes, the right parts, and no surprises later. If you can use a small screwdriver and follow instructions carefully, you can do this.
Can You Upgrade Laptop RAM and Storage on Your Model?
Before you spend a single rupee, dollar, or pound, find out what your laptop physically allows. This is the step people skip most often, and it is the one that causes the most wasted money.
Soldered vs. Socketed RAM
Many modern thin-and-light laptops have soldered RAM, meaning the memory chips are attached directly to the motherboard. You cannot remove or add to them. Most MacBooks since around 2016, many ultrabooks, and a lot of budget Chromebooks fall into this group. Some laptops are a mix: 8GB soldered plus one empty SO-DIMM slot you can fill.
Gaming laptops, business models like the Lenovo ThinkPad T and P series, and many mid-range Dell, HP, and Asus machines still use socketed SO-DIMM slots. Those are the easy wins.
Storage Slots: M.2, SATA, or Both
Storage is usually more upgrade-friendly than memory. Most laptops from the last several years have at least one M.2 slot, and some older or larger models still have a 2.5-inch SATA bay. A few have both, which means you can keep your old drive and add a second one.
The catch is that M.2 is a physical shape, not a speed. An M.2 slot can support NVMe (fast, PCIe-based), SATA (slower), or only one of them. Drive length matters too. Most laptops take 2280 drives (22mm wide, 80mm long), but some compact models use 2230 or 2242.
How to Check What You Have
Use at least two of these methods so you are not relying on one source:

- Read the official spec sheet or service manual. Search your exact model number plus “service manual” or “hardware maintenance manual.” Lenovo, Dell, and HP publish detailed ones that list maximum RAM, slot count, and supported drive types.
- Run a system scanner. Tools like Crucial System Scanner, CPU-Z (Memory and SPD tabs), or HWiNFO show your current RAM type, speed, and how many slots are filled.
- Check Task Manager. On Windows, open Task Manager, go to Performance, then Memory. It shows “Slots used: 1 of 2” on many systems, which tells you instantly whether there is room to grow.
- Look at a teardown. Repair communities post photos of the inside of most popular models, so you can see the slots before you open anything.
When an Upgrade Is Not Worth It
Be honest about the math. If your laptop has a very old processor, a failing battery, and a cracked hinge, a $60 RAM stick will not fix the experience. A good rule: upgrade when the rest of the machine is sound and only one or two parts are holding it back. Signs you are a good candidate include constant disk activity, slow boot times on an old hard drive, and apps freezing when you have many browser tabs open.
Choosing Compatible Parts to Upgrade Laptop RAM and Storage
Getting the right part is most of the job. A module that does not match your system will either not fit, not boot, or quietly run slower than it should.
Picking the Right Laptop RAM
Laptop memory comes as SO-DIMM modules, which are shorter than desktop sticks. Match these details to what your laptop already uses or what the manual lists:
- Generation: DDR3, DDR4, and DDR5 are not interchangeable. The notch sits in a different spot on each, so the wrong one will not even go in. Laptops from roughly 2015 to 2021 mostly use DDR4; newer ones increasingly use DDR5.
- Speed (MHz or MT/s): Faster RAM will usually work but will run at the speed your laptop supports. Slower RAM drags everything down to its level. Match or slightly exceed the current speed.
- Capacity per slot: Check the maximum per slot and in total. Putting a 32GB stick in a laptop that only addresses 16GB per slot will not work.
- Dual-channel pairs: Two identical modules (for example, 2x8GB instead of 1x16GB) let the processor use dual-channel mode, which noticeably helps integrated graphics and general responsiveness.
How much do you need? For everyday browsing and office work, 16GB is the comfortable standard in 2026. For photo and video editing, programming with virtual machines, or gaming, 32GB is worth it. 8GB is now tight for Windows 11 with a modern browser.
Picking the Right Laptop SSD
For a laptop SSD upgrade, three questions decide the purchase:
- Form factor: M.2 2280, 2242, 2230, or 2.5-inch SATA. Measure or check the manual.
- Interface: NVMe PCIe (Gen 3, Gen 4, or Gen 5) or SATA. A Gen 4 drive works in a Gen 3 slot at Gen 3 speeds, but an NVMe drive will not work in a SATA-only M.2 slot.
- Single or double-sided: Very thin laptops sometimes only fit single-sided M.2 drives. This matters more than people think.
If you are coming from a spinning hard drive, any SSD will feel dramatically faster. If you are going from one NVMe drive to another, the gain is mainly capacity, so do not overpay for top speeds your laptop cannot use.
Buy From Sources You Can Hold Accountable
This is where the ethics section later in this guide becomes practical. Buy from the manufacturer’s own store, an authorized distributor, or a large retailer where the item is sold and shipped by the retailer itself, not a random third-party seller. A price that is 30 to 40 percent below every other listing is a warning sign, not a lucky find. Keep the receipt and the box, since you will need both for any warranty claim on the new part.
The 7 Steps to Upgrade Laptop RAM and Storage at a Glance
Here is the full process in order. The sections below walk through each part in detail.
- Confirm your laptop is upgradeable and note the exact part specs.
- Buy genuine, compatible RAM and SSD from accountable sellers.
- Back up your data and gather your tools.
- Power down fully, disconnect the battery, and open the case.
- Install the new RAM.
- Install or clone the new SSD.
- Close up, verify everything works, and wipe or securely store the old drive.
Tools You Will Need
You do not need a professional kit, but a few items make the job much safer:
- Precision screwdriver set with Phillips #0 and #00 heads, plus Torx T5 and T6 for some brands
- Plastic pry tools or an old guitar pick for releasing clips on the bottom panel without scratching it
- Anti-static wrist strap, or at least a habit of touching bare metal before handling parts
- A magnetic mat or a few small cups to keep screws sorted, since laptop screws are often different lengths
- An M.2-to-USB enclosure (about $15 to $25) if you plan to clone your old drive to a new one
- Good light and a clean, hard surface, not a carpet or bed
Back Up Before Anything Else
A RAM swap rarely touches your data, but a storage swap always does. Make a full backup of your important files to an external drive or cloud service before you start. If you use BitLocker on Windows, find and save your BitLocker recovery key from your Microsoft account first. Hardware changes can trigger a recovery prompt, and without that key your data can be permanently locked.
Anti-Static and Battery Safety
Static electricity can kill a memory module without any visible sign. Work on a hard floor if you can, avoid wool sweaters, and touch an unpainted metal surface before you handle components. Most importantly, disconnect the internal battery cable once the case is open. Laptops still send small amounts of power to the motherboard when they are “off,” and installing parts while it is live is one of the most common ways people short a board.
How to Upgrade Laptop RAM Step by Step
Once the case is open, a laptop RAM upgrade usually takes less than ten minutes.
Opening the Laptop
- Shut down completely. Use Shut Down, not Sleep or Hibernate. On Windows, holding Shift while clicking Shut Down forces a full power-off rather than Fast Startup.
- Unplug the charger and any accessories.
- Remove the bottom panel screws. Note that some screws are hidden under rubber feet or labels, and some are “captive,” meaning they stay attached to the panel. Keep track of which screw came from where.
- Release the panel clips. Start at a corner or near the hinge, slide a plastic pick in, and work your way around slowly. Never force it with a metal screwdriver.
- Disconnect the battery. Gently lift the battery connector straight up or slide it out, depending on the design.
- Press the power button for 10 to 15 seconds with the battery disconnected to drain leftover charge.
Removing the Old Module
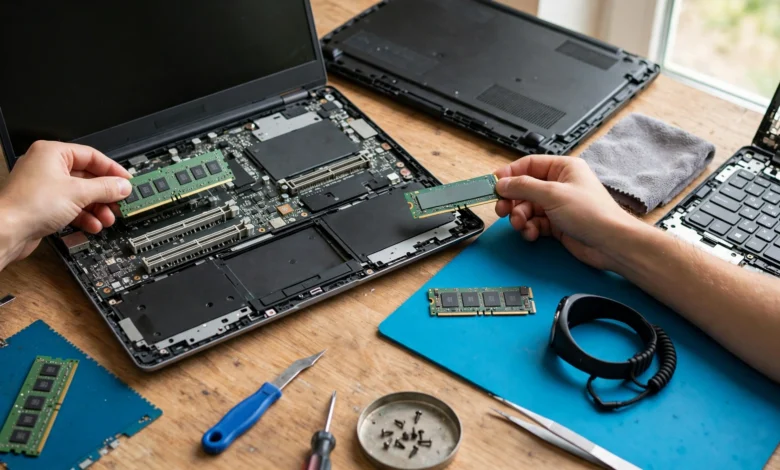
Locate the RAM slot. It may sit under a thin metal shield or black film that you can lift. Each SO-DIMM module is held by two small metal clips on either side. Push both clips outward at the same time, and the module will pop up to about a 30-degree angle. Pull it straight out along that angle.
Installing the New RAM
- Hold the new module by its edges and avoid touching the gold contacts.
- Line up the notch with the key in the slot.
- Insert it at the same 30-degree angle, firmly, until the gold contacts are almost fully hidden.
- Press it down flat until both clips snap into place. You should hear or feel a click.
- If there are two slots stacked on top of each other, fill the lower one first.
Checking It Worked
Reconnect the battery, put the panel back loosely, and power on. The first boot after a RAM change can take a bit longer because the system retrains memory timings, and the screen may stay black for up to a minute. That is normal. Once you are in Windows, check Settings, then System, then About to confirm the new total. On macOS or Linux, use About This Mac or the free command respectively.
If you want extra confidence, run Windows Memory Diagnostic or the free MemTest86 tool. A few passes without errors means the module is healthy.
How to Upgrade Laptop Storage With a New SSD
To upgrade laptop storage, you have two paths: clone your existing drive so everything stays exactly as it was, or do a clean install of your operating system on the new drive. Both are valid.
Option A: Clone Your Old Drive
Cloning copies your system, apps, and files to the new SSD so you boot into the same setup you had before. It is the easier choice for most people.
- Put the new SSD into a USB enclosure and plug it into the laptop.
- Use cloning software. Many SSD makers provide free tools (Samsung Data Migration, Crucial’s Acronis edition, WD’s Acronis edition), and Macrium Reflect or Clonezilla are common alternatives.
- Choose the old drive as the source and the new SSD as the destination. If the new drive is larger, make sure the tool expands the main partition to use the extra space.
- Let it finish completely. Do not use the laptop heavily during the clone.
- Shut down, open the case, and swap the drives.
Option B: Clean Install
A fresh install clears out years of clutter and often makes the laptop feel even faster. Create a Windows installation USB with Microsoft’s Media Creation Tool (or the equivalent for your OS), install the new SSD, boot from the USB, and follow the setup. Your Windows license is usually tied to your hardware and activates automatically. Then restore your files from the backup you made earlier.
Physically Installing an M.2 SSD
- Find the M.2 slot, often under a heat spreader or thermal pad. Keep any thermal pad and reuse it.
- Remove the single small retaining screw at the end of the slot.
- Slide the SSD in at a slight angle, label side up, until the contacts are fully seated.
- Press the far end down gently and replace the screw. Do not overtighten; it only needs to hold the drive flat.
Installing a 2.5-Inch SATA SSD
Older laptops often hold the drive in a small metal caddy. Remove the caddy screws, slide the drive away from its connector, unscrew the old drive from the caddy, fit the new one, and reverse the steps.
After the Swap
Boot up and check the drive appears with the right capacity. If the laptop does not boot from it, enter the BIOS or UEFI settings (usually F2, F10, F12, or Delete at startup) and set the new SSD as the first boot device. Finally, install the drive maker’s utility. Tools like Samsung Magician, Crucial Storage Executive, or WD Dashboard check firmware, health, and, importantly, whether the drive is genuine.
The Ethics and Realities of a DIY Laptop Upgrade
The technical steps are the easy part. The decisions around them are where people lose money, data, or trust. Here are three real cases that show what can go wrong, and what each one teaches you.
Case 1: Illegal “Warranty Void” Threats
Many people never open their laptop because they assume it voids the warranty. In the United States, that assumption is often wrong, and some companies have been caught pushing it illegally.
In June 2022, the FTC brought complaints against Harley-Davidson and Westinghouse generator maker MWE Investments. The agency said their warranties wrongly told customers that using independent parts or repair shops would void coverage, which breaks the Magnuson-Moss Warranty Act. You can read a legal summary of the FTC right-to-repair complaints against Harley-Davidson and Westinghouse. Grill maker Weber faced similar action around the same time.
Those companies do not make laptops, but the law is the same for electronics. Under it, a US manufacturer generally cannot deny warranty coverage simply because you added RAM or swapped a drive. It can deny coverage for damage you caused, like a cracked connector from forcing a module. So the practical takeaway is:
- Your right to upgrade laptop RAM and storage is real, but so is your responsibility to do it carefully.
- Keep your original parts. If you need warranty service later, putting the original RAM and drive back avoids arguments.
- Rules outside the US vary by country. Check your local consumer protection law and your warranty terms before you assume either way.
- On the ethical side, do not hide damage you caused and then claim it was a factory defect. That is warranty fraud, and it raises costs for everyone.
Case 2: Counterfeit SSDs That Pass a Quick Look
Fake storage is one of the biggest real risks of a laptop SSD upgrade. Counterfeits of the Samsung 990 Pro have surfaced repeatedly. In one case reported by Guru3D, a buyer in India paid about $180 for a “990 Pro 2TB” that looked legitimate, but it ran at roughly 20 MB/s and Samsung Magician flagged it as non-genuine. See the full report on how a fake Samsung 990 Pro SSD fooled a buyer.
Other reports describe fakes that hit near-real speeds in short benchmarks, then slow to a crawl during long file transfers once the cache fills up. Some fakes report a larger capacity than the chips actually hold, which can corrupt your files once you fill them. Hardware news sites have also described scammers peeling genuine labels off broken drives and sticking them on cheap counterfeits.
How to protect yourself:
- Buy only from the brand’s store or authorized retailers, never from a listing that is far below market price.
- Run the maker’s official utility right after installation to confirm authenticity.
- Test sustained performance by copying a large folder (50GB or more), not just a quick benchmark.
- Check the real capacity with a tool like H2testw or ValiDrive before trusting the drive with important data.
- If you receive a fake, report it to the platform and the brand. Do not resell it to someone else to recover your money.
Case 3: Old Drives That Leaked Millions of Records
The drive you pull out of your laptop still holds your passwords, photos, documents, and browser history. In September 2022, Morgan Stanley agreed to a $35 million SEC penalty after old hard drives from decommissioned equipment were resold on an auction site without being wiped. The SEC said data from roughly 15 million customers was put at risk, and the problem only came to light when an IT consultant who bought some of the drives contacted the firm. The Register’s coverage of the Morgan Stanley hard drive case explains how a moving company with no data destruction experience ended up handling the devices.
If a global bank can get this wrong, an individual selling an old SSD on a marketplace definitely can. Before you sell, donate, or recycle your old drive:
- Use the manufacturer’s Secure Erase or Sanitize function, or a trusted tool built for that purpose. A normal quick format leaves data recoverable.
- If the drive is failing and cannot be wiped, physically destroy it before disposal.
- Recycle e-waste through a proper electronics recycler, not regular trash.
- Be honest when reselling. Describe used parts as used and state their condition and remaining health.
Common Mistakes and Troubleshooting
Most failed upgrades come down to a handful of avoidable errors. Here is what to watch for and how to fix it.
Mistakes to Avoid
- Buying before checking. The most common mistake is ordering RAM for a laptop with soldered memory, or an NVMe drive for a SATA-only slot.
- Mixing mismatched RAM. Different speeds or sizes usually work, but can disable dual-channel mode or cause instability. Matched pairs are safer.
- Skipping the battery disconnect. This is how many boards get damaged.
- Forcing the bottom panel. Snapped clips and cracked plastic happen when people rush.
- Forgetting the BitLocker key. This can lock you out of your own data after a storage change.
- Throwing away the thermal pad on the SSD slot, which can cause the new drive to overheat and throttle.
If the Laptop Will Not Boot
- Reseat the RAM. Pull it out and push it in again firmly until both clips lock. Most “no boot” problems after a laptop RAM upgrade are a module that is not fully seated.
- Try one module at a time to find out if one is faulty.
- Wait longer on the first boot, since memory training can take a minute or more on some systems.
- Listen for beep codes or watch for blinking lights, then look up what they mean for your brand.
- For storage, check the boot order in BIOS or UEFI, and confirm the SSD is detected there at all.
When to Call a Professional
Doing it yourself is not a test of pride. Use a reputable repair shop if your model requires removing the keyboard or motherboard to reach the slots, if the laptop is still under warranty and the maker offers free or cheap upgrades, if you are uncomfortable working near the battery, or if you simply do not have the right tools. A good technician will show you the parts, give you a receipt, and hand back your old drive so you control your data.
Conclusion
When you upgrade laptop RAM and storage yourself, you save money, extend the life of a machine you already own, and keep a working device out of the e-waste pile, but only if you go in prepared. Check whether your model has socketed RAM and which SSD form factor and interface it supports, buy genuine parts from sellers you can hold accountable, back up your data and save your BitLocker key, disconnect the battery before touching anything, and verify both the new parts and their authenticity once you are done. The real cases covered here, from the FTC’s action against illegal warranty threats to counterfeit Samsung SSDs and Morgan Stanley’s $35 million penalty over unwiped drives, all point to the same lesson: the screwdriver work is simple, and the care you take before and after it is what makes a laptop RAM upgrade or laptop SSD upgrade a smart, honest, and lasting improvement.